Game environment art includes all surroundings within the game world. It defines how players perceive space, navigate levels, and understand gameplay context. But in terms of production, it is a structured system that combines artistic and technical approaches to create a playable environment. This article explores how to plan and assess the creation of environments for projects.
What Game Environment Art Includes: Core Components
Game environment design generally covers everything that exists in the world, playable and not. That includes all locations and levels.
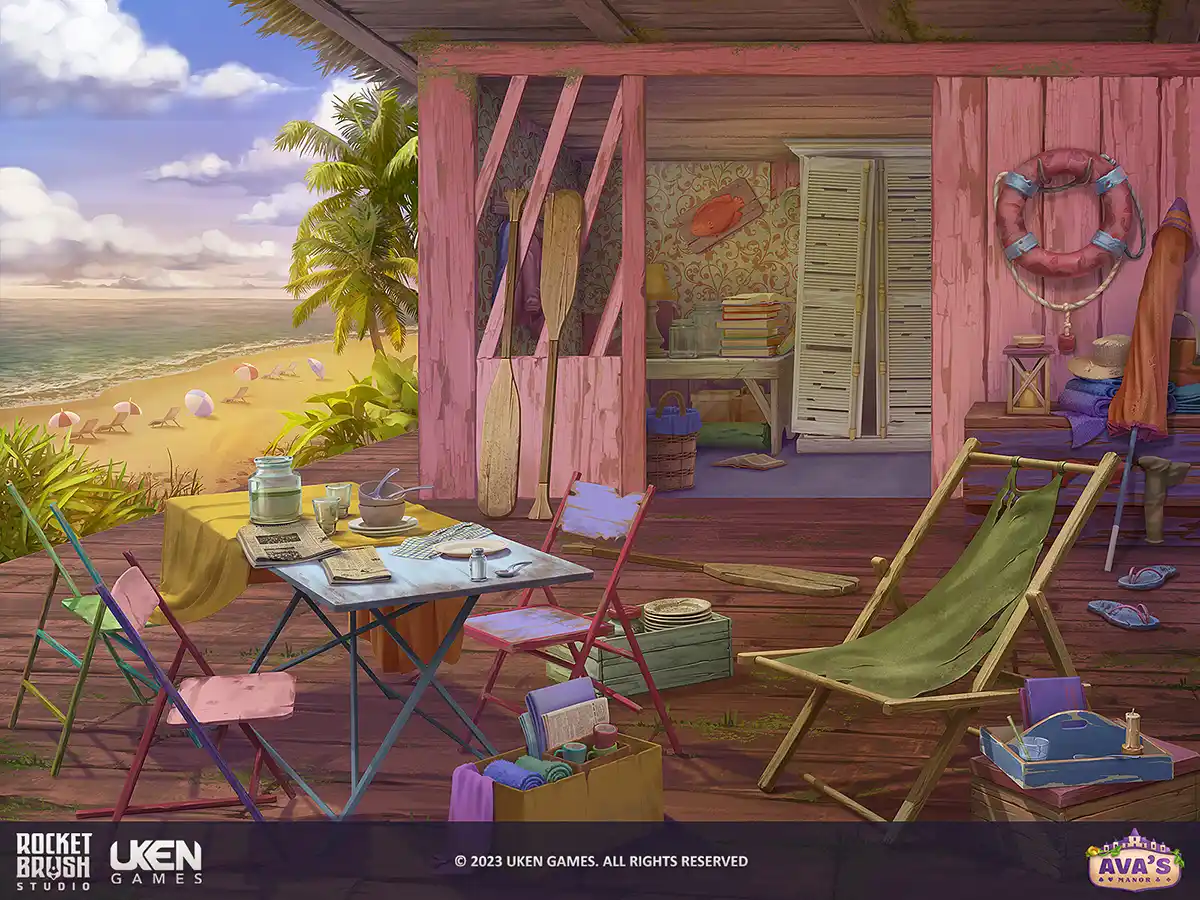
2D game environment design for the project Ava’s Manor created by RocketBrush Studio art team
Here are the core components of an in-game environment:
Backgrounds (2D/3D) establish setting and atmosphere. In 2D, these are painted or layered scenes, and in 3D, they can be distant geometry, skyboxes, or background environments that frame the playable space without direct interaction.
Props and set dressing are individual objects that populate the environment, such as furniture, debris, vegetation, signage, or everyday items.
Architecture and structures such as houses, bridges, ruins, and industrial structures define the main spatial layout and often guide player movement and navigation.
Terrain and landscapes shape the overall topology of a level and influence traversal and gameplay flow.
Modular kits include reusable building components (walls and structural parts, ground pieces, major surface elements, large set-dressing elements) designed to be combined in multiple ways.
Textures and materials are essential for visual cohesion and material realism. They define how objects look and react to light.
FX elements add motion and bring life to environments. Details like waterfall splashes, dust, or ambient particles help reinforce mood, depth, and environmental storytelling.
These elements work together as a single system, where each asset supports composition, gameplay readability, and performance requirements.
The look of the in-game environment heavily depends on the visual style you choose for the project. Check out our article about the three main art directions to quickly recognize the most fitting approach for your project.
[[ref:realism-vs-stylization-art-in-games]]
Types of Game Environment Art: 3D, 2D, and Hybrid Approaches
Environment art is a vital part of both 2D and 3D games. While the goals are similar across formats, the approach, tools, and constraints differ significantly depending on the visual and technical direction of the project.
3D Game Environment Design
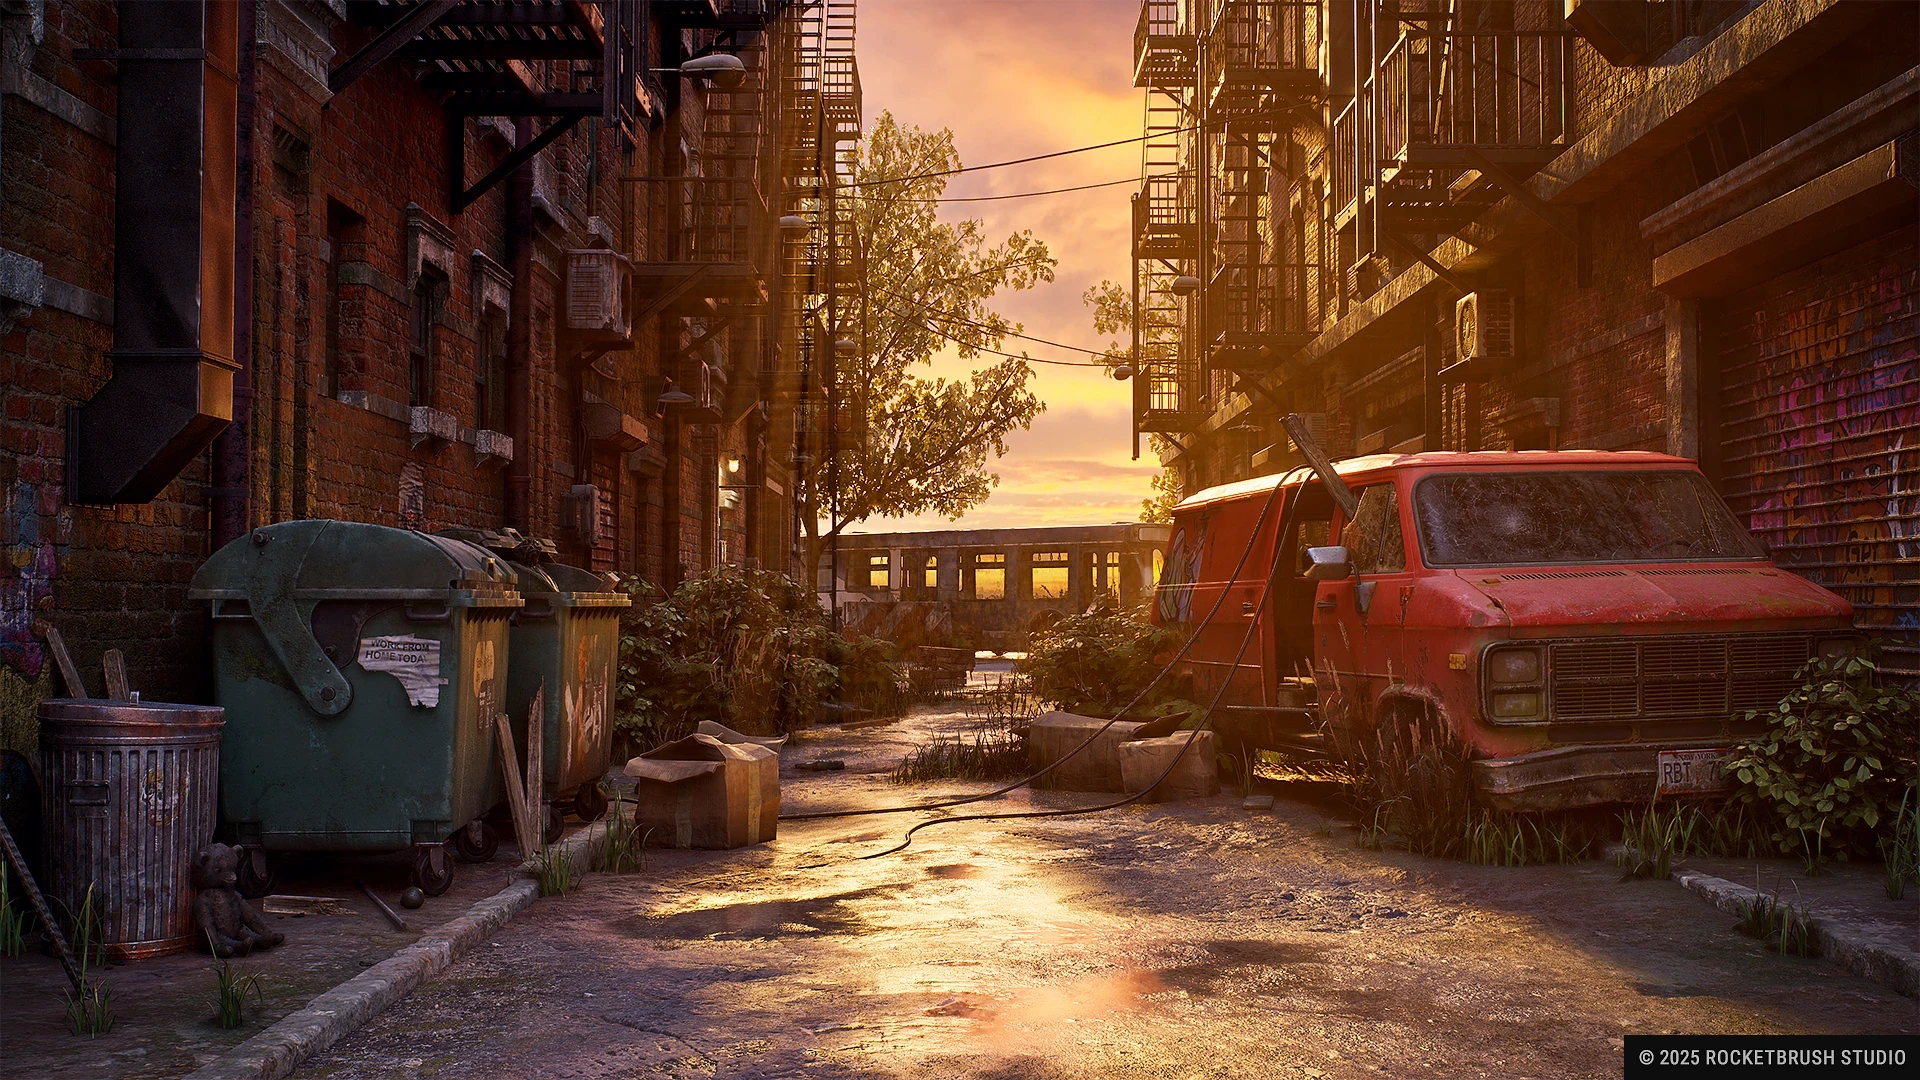
A post-apocalyptic New York 3D environment by RocketBrush Studio, with modular buildings, street props and debris.
3D environment design is used in AAA games, mid-core titles, and immersive real-time experiences where players can freely navigate complex spaces.
Typical 3D game environment deliverables include modular environment assets, materials and shaders, and lighting setups that define the mood and visual clarity of the scene.
This workflow is constrained by polycount limits, FPS performance targets, and engine-specific technical requirements, all of which directly affect asset complexity and level design decisions.
2D Game Environment Design
A beachside villa environment created by our team at RocketBrush Studio for Ava’s Manor, a mobile renovation game.
2D environment design is commonly used in mobile games, casual games, and stylized 2D titles. In these projects, environments are typically built as layered visual compositions rather than fully navigable 3D spaces.
Typical deliverables include backgrounds, tilesets, and layered parallax scenes that create depth and visual interest while maintaining a lightweight structure.
This approach is constrained by strict resolution limits, tight memory and performance budgets, and fixed camera framing, which heavily influence how environments are composed and optimized.
Hybrid Approaches
Many modern pipelines combine 2D and 3D workflows. These hybrid approaches may include:
2.5D environments — scenes built from layered 2D elements or flat planes in 3D space, they create depth without the need to fully model everything in 3D.
Painted backgrounds with 3D elements — hand-painted environments combined with 3D characters or props are used to speed up production but maintain a strong artistic look.
2D overlays on 3D spaces — 2D effects, UI elements, or stylized details can be placed on top of 3D environments to enhance readability or style control.
Teams turn to these hybrid workflows when they need to balance art direction control, production speed, and technical efficiency.
Game Environment Art Workflow: From Visual Direction to Final Delivery
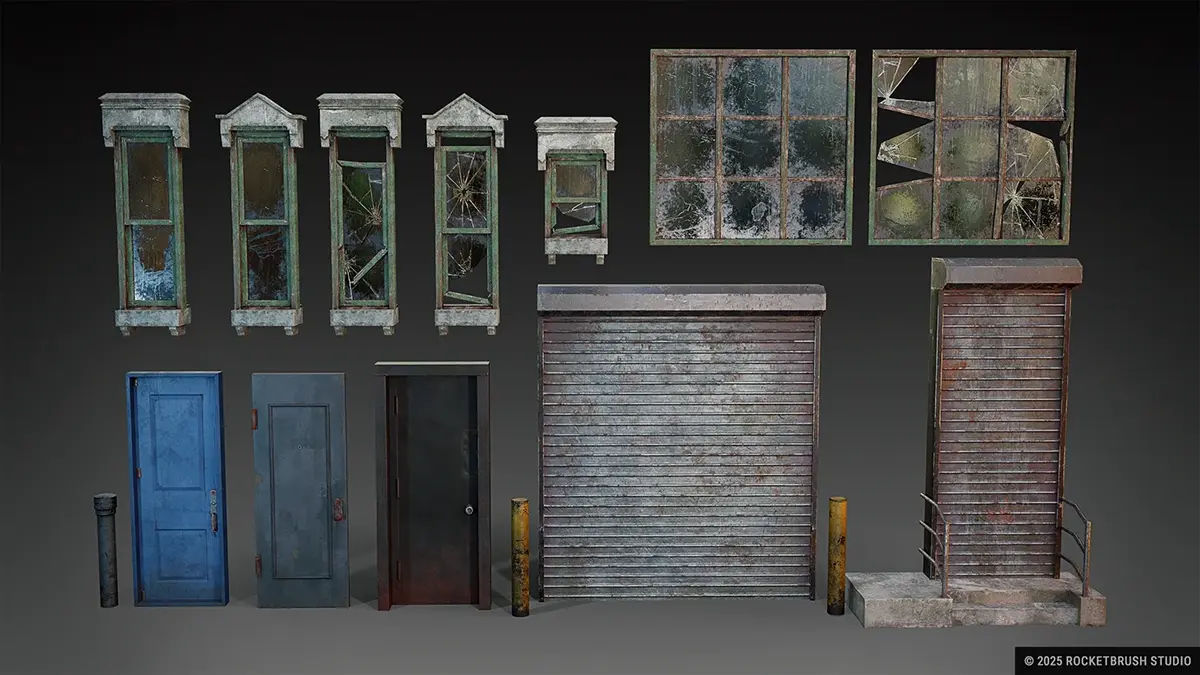
Modular reusable assets created by RocketBrush Studio for a large-scale post-apocalyptic 3D game environment set in New York.
Environment creation is a multi-stage pipeline that connects art direction, design, and technical implementation. 2D and 3D environment design may differ in details, but there is a universal pipeline that includes the steps required for developing in-game assets and surroundings.
1. Visual Direction
This stage defines the overall look and artistic foundation of the project. It ensures everyone on the team shares a consistent visual target before production begins. Keep in mind that character style might differ from environment.
Before production starts, the team should align on several core inputs:
Style definition establishes the overall visual language of the project, including realism level, color palette, and shape language. The team decides whether in-game world should look realistic, semi-stylized, or fully cartoon-like.
References and benchmarks are collected to help define quality targets and stylistic consistency. This is where you should bring up concept art, film stills, or other games as examples for lighting and environment mood.
Alignment with game vision means the art style has to support gameplay, narrative, and target audience. Horror games set in darker, desaturated worlds to reinforce tension, while a casual mobile game may take place in a bright, colorful environment.
2. Planning & Scope
This stage translates the visual direction into a concrete production plan, this is where the team defines what needs to be built and how much work it requires.
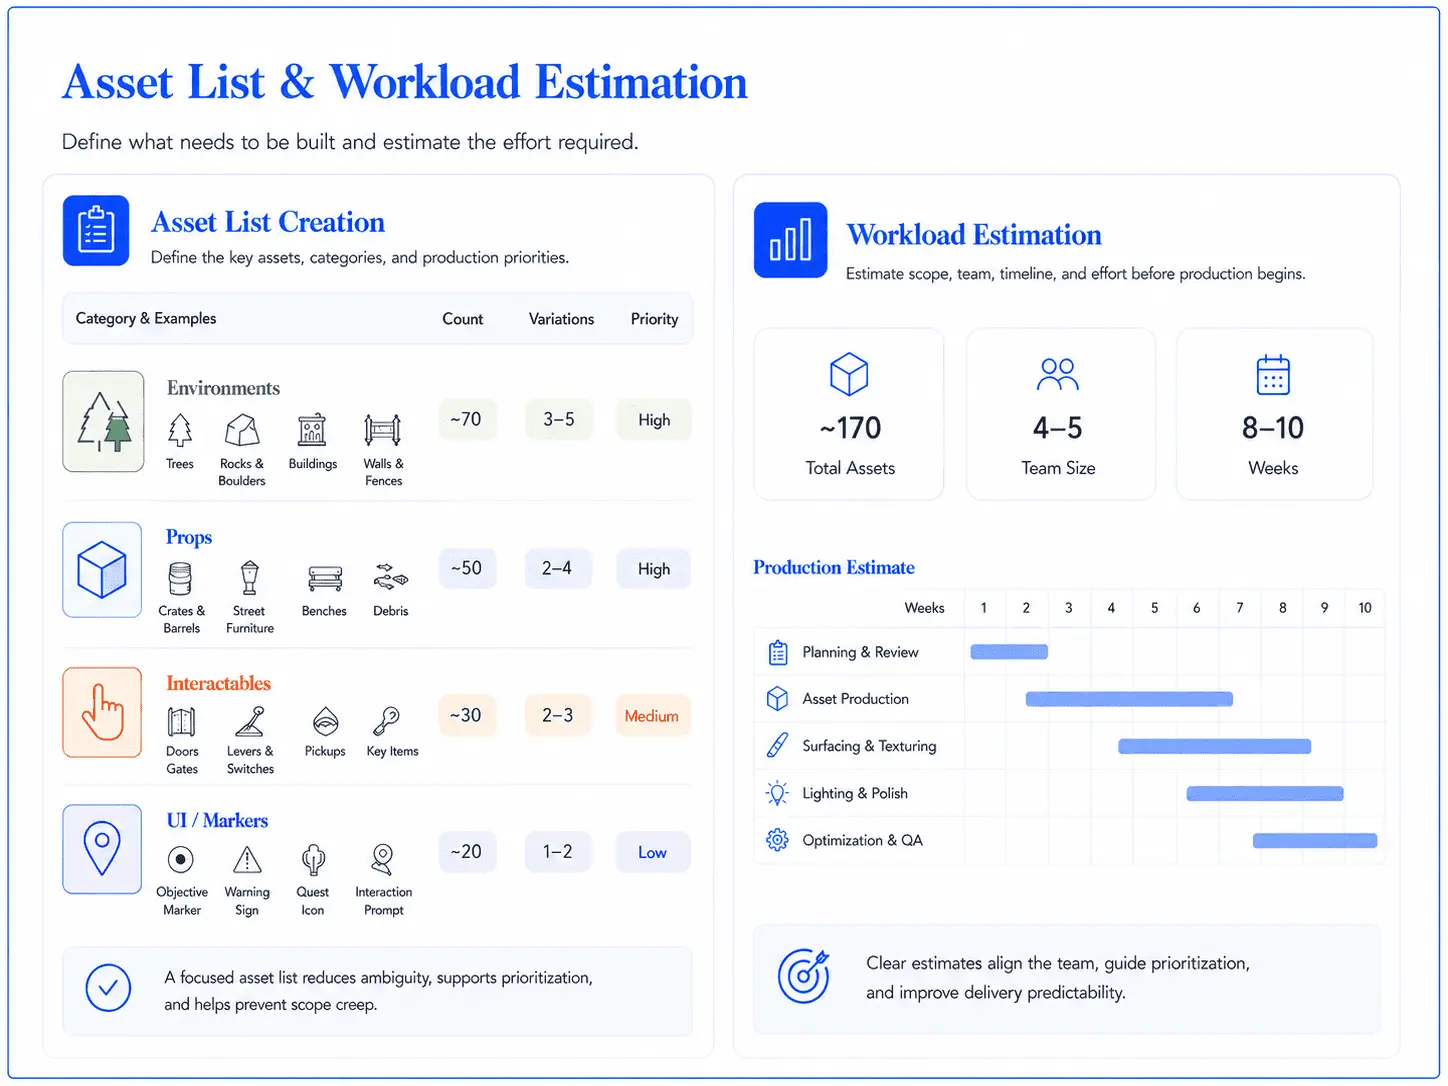
Asset list and workload estimation example for planning game environment art production.
To make the scope manageable, the team needs to define what to create, what to reuse and how much effort it will take:
Asset list creation is a step where your team defines everything that will be produced for the project. The list includes environments, props, and UI elements such as forest trees, rocks, buildings, and interactable objects.
Modular vs unique asset decisions have to be made to determine what can be reused versus what must be uniquely designed. For example, it makes sense to reuse wall and floor modules for a city environment, but specific objects or landmarks need to be unique.
Workload estimation includes calculating time, cost, and resource requirements based on scope.
The planning stage often overlaps with early blockout, since rough layouts help estimate production scope.
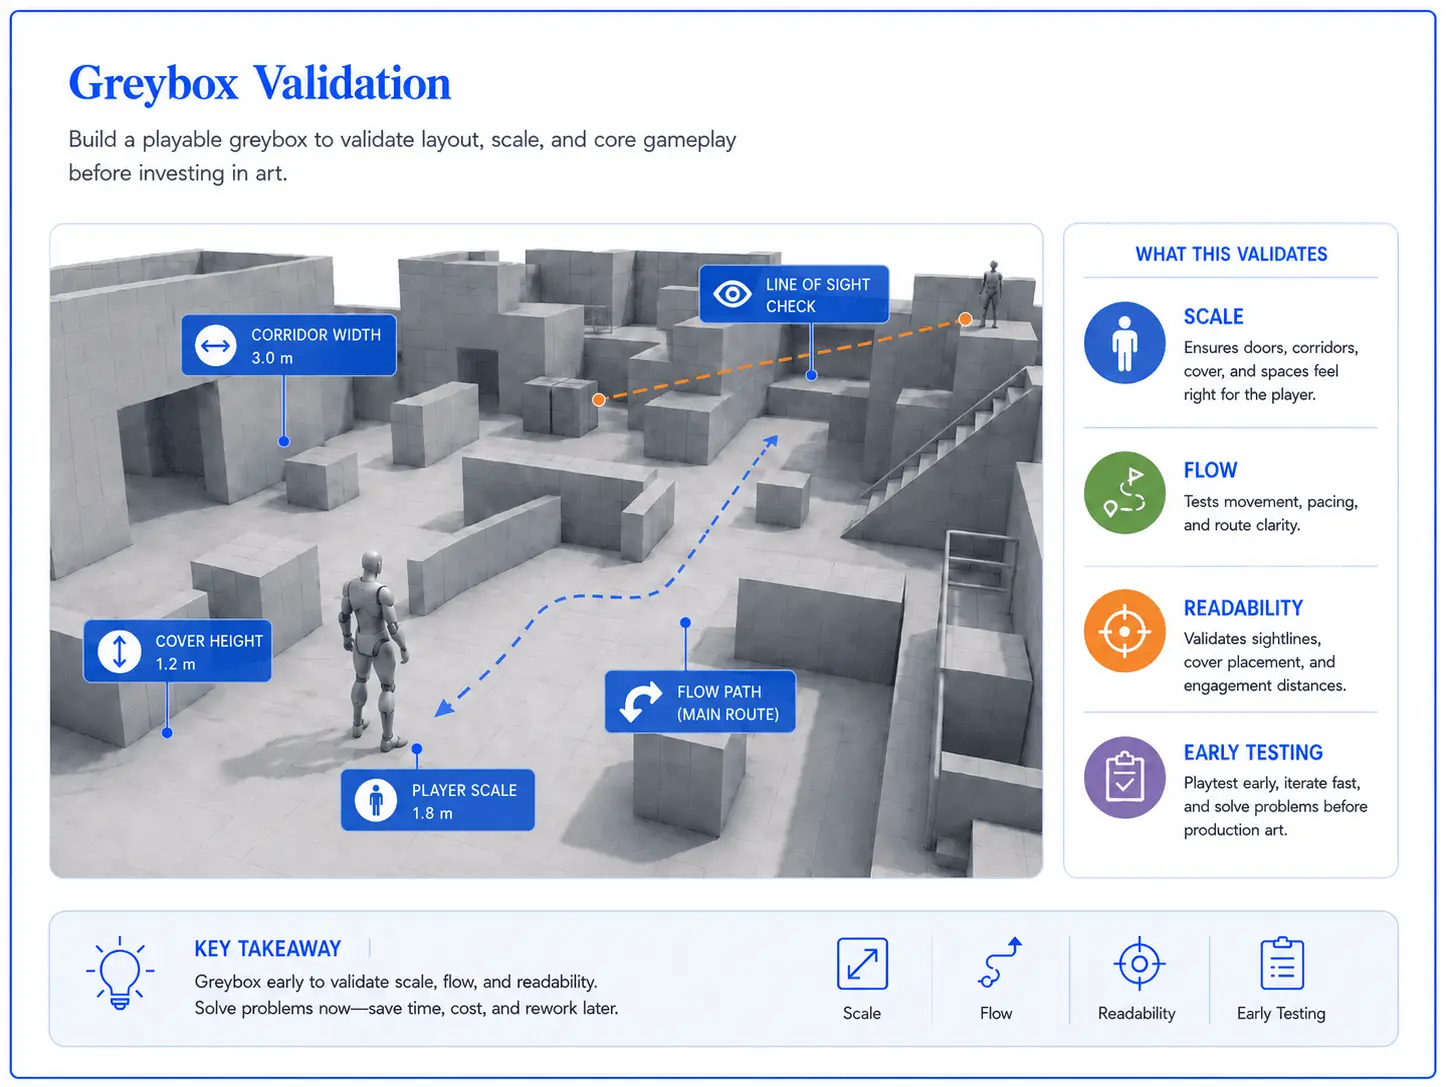
3. Blockout, Scale, and Gameplay Validation
This stage focuses on building a rough version of the environment to test structure, scale, and gameplay before final assets are created. It is driven by level or game design, since it requires gameplay metrics, pacing logic, and player flow knowledge.
Greybox blockout used to check scale and layout before final environment art production.
At this stage, the team checks whether the environment works as a playable space:
Greyboxing environments means building simple placeholder geometry to define space and structure. Our team uses basic cubes and primitives to lay out a level before anything more detailed is created.
Defining scale and proportions is done to ensure that objects and spaces match player scale and gameplay needs. The team makes sure that doors are tall enough for the player character and corridors support intended movement flow.
Early gameplay validation is the first testing round. Your team has to make sure that the level design works before final assets are produced. For example, seeing if a combat arena has enough cover or whether a platforming section feels readable.
4. Production
This is where the final visual content is created based on approved designs and blockout feedback. It is typically the most time-intensive phase.
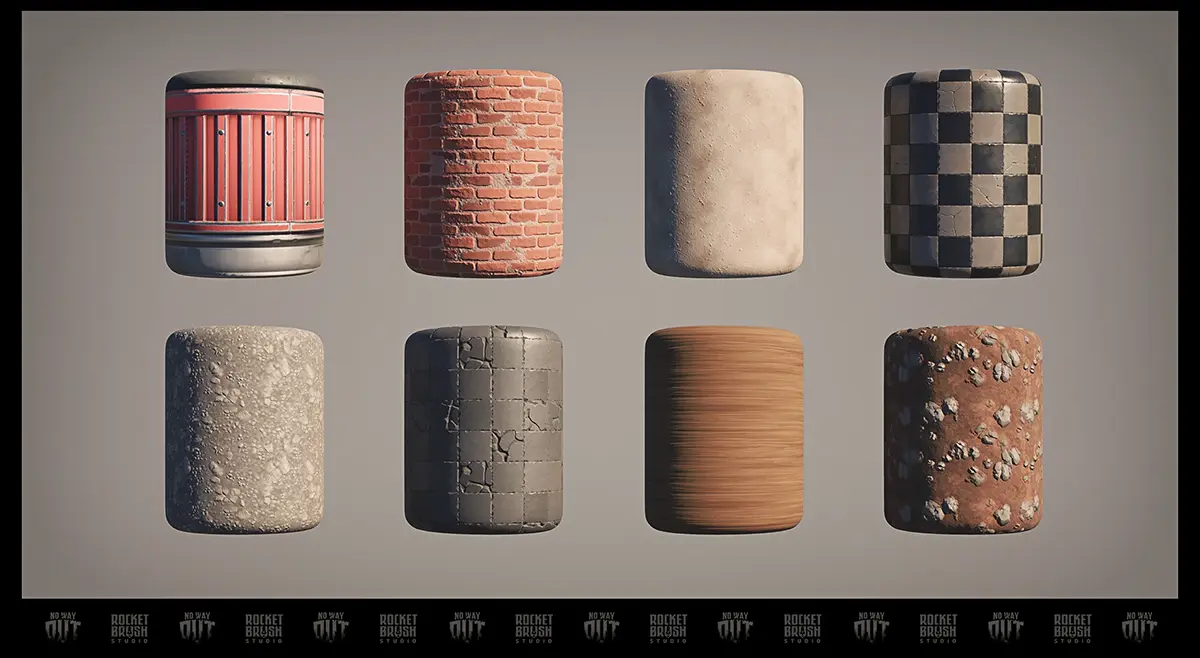
Textures and materials created by RocketBrush Studio for No Way Out, a top-down survival game prototype
Production includes several stages, each of which helps create a realistic environment.
Asset creation includes designing final versions of assets based on approved designs. This is where we normally create detailed 3D models of buildings, painting textures for wood and stone, and set them up in-engine.
Set dressing and environment filling involves placing assets into the scene to build atmosphere and detail. We agree on and add elements like debris, vegetation, furniture, and props to make a space feel lived-in and add realism. This step also includes lighting and shader setup.
Iteration cycles allow to refine assets and environments based on art direction and playtesting feedback. Usually, during this stage we communicate closely with the developer on adjusting lighting or replacing props that break readability or mood.
5. Integration
This stage focuses on bringing all assets into the engine and assembling them into functional, playable environments.
Engine implementation means bringing assets into the game engine and ensuring they function correctly. This is where we import models into Unreal or Unity (we have a guide on choosing between the two engines) and set up things like collision and interaction systems.
Scene assembly means structuring full environments from individual assets, like building a complete forest level from modular trees, rocks, and terrain pieces.
6. Optimization & Final Delivery
This final stage ensures the environment performs well, looks polished, and is ready for release across target platforms.
Performance tuning includes technical optimizations to improve rendering performance: using lower-detail models, combining textures to reduce memory usage, finalizing texture atlases. All of this is done to ensurу that the game runs efficiently across target platforms.
Final polish and export stage is where we complete visual refinements and prepare assets for release.
Pipeline steps may change, some can be added or removed, depending on project scale, engine used, and team structure. But generally, this is the process you should expect. If you need support with environment assets, modular kits, or full in-game locations, RocketBrush Studio can help plan and produce game-ready environments for your project.
[[cta:Need game art for your next project?:Tell us about your game, and we’ll assemble a production-ready art team with a pipeline tailored to your style, platforms and deadlines.]]
How to Work with an External Environment Art Team
Outsourcing environment art can help when internal capacity is limited, specialized skills are needed, or several locations need to be produced in parallel. The process works best when the team has clear inputs before production starts and clear review criteria once assets are delivered.
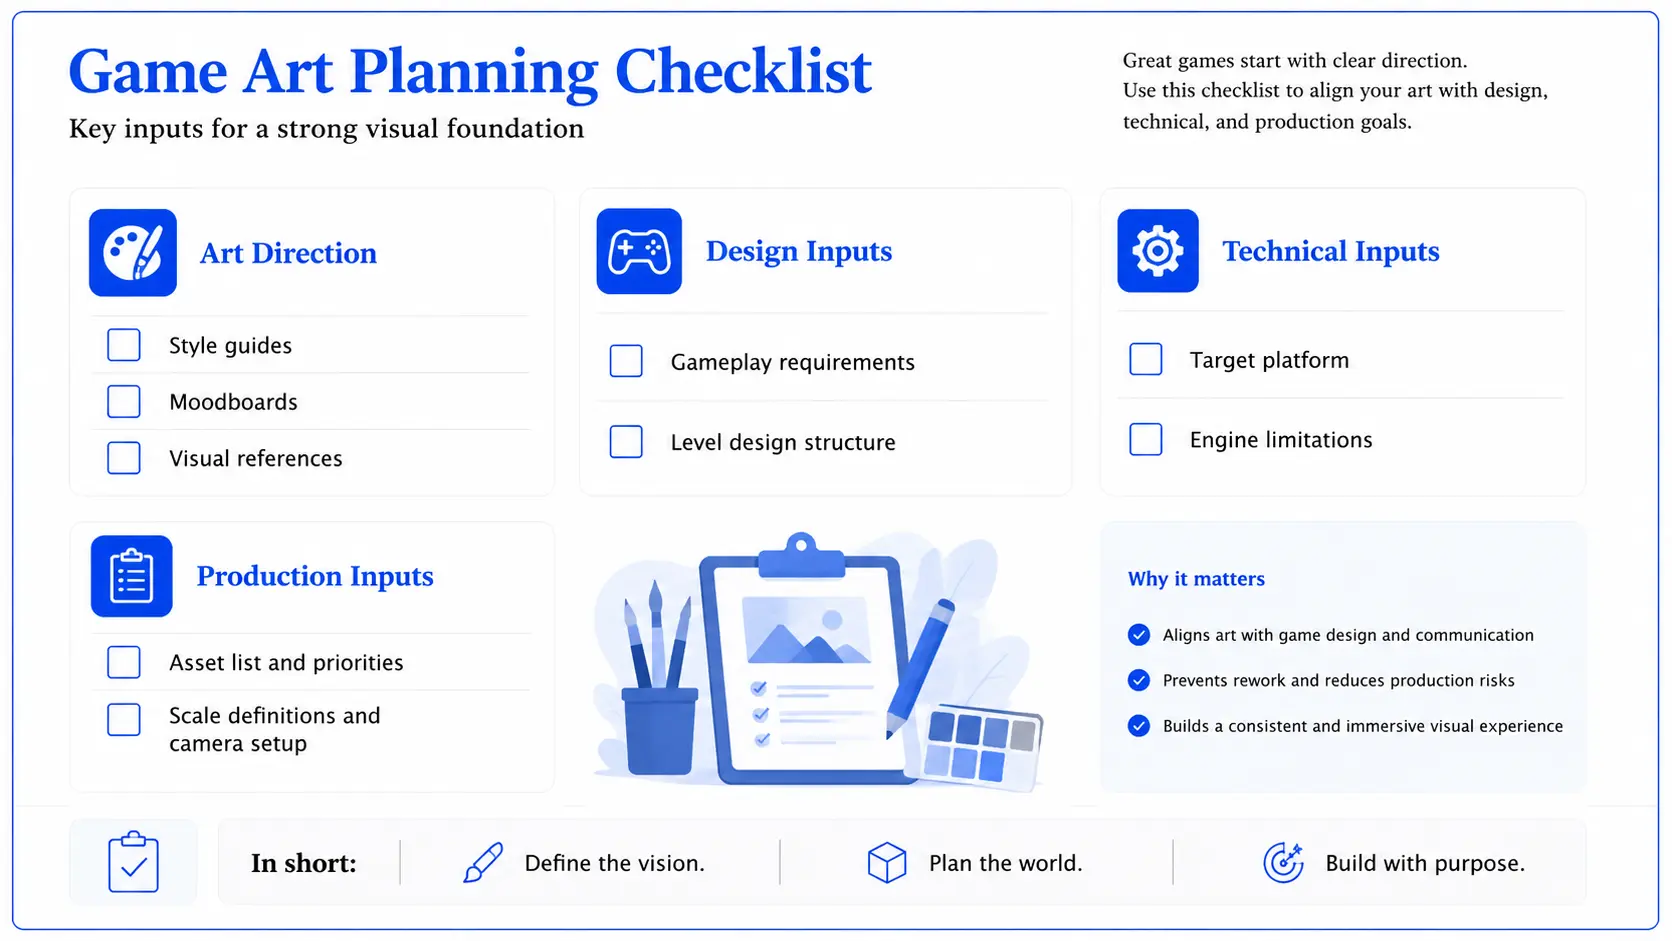
Environment Art Planning Checklist: What to Prepare Before Production
Whether environment art is produced internally or with an external team, the process works better when the key inputs are clear from the start. The team needs to understand the visual direction, gameplay requirements, technical limits, and production priorities before creating final assets.
This is especially important for outsourced environment art, where missing references, unclear scale, or late technical constraints can lead to extra iterations and rework. The checklist below summarizes the main materials that help align the team before environment production begins.
A graphic game art planning checklist for approaching a vendor
How to Evaluate Game Environment Art Quality
When reviewing environment art, it is not enough to look only at visual quality. The scene also needs to work in gameplay context, match the project’s technical requirements, and stay consistent with the approved production standards.
Visual quality: Review the style consistency, composition clarity, and readability in gameplay context.
Gameplay clarity: Evaluate how a player can navigate and move through the designed space.
Technical quality: Assess the level of optimization and performance stability, depending on the platform.
Production quality: Make sure that the file structure and naming conventions are maintained across the project.
FAQ
What is game environment art?
It is the creation of all visual spaces in a game, including levels, props, terrain, and background systems.
What are the core components of a game environment?
Core components include backgrounds, props, architecture, terrain, modular kits, textures/materials, and FX elements, all working together to create a cohesive and functional game world.
What is the difference between 2D and 3D environment design?
2D environments use layered visuals with fixed perspectives and strict performance limits, while 3D environments allow full navigation in real-time spaces but require optimization for performance and technical constraints.
What are the main stages of the environment art pipeline?
The pipeline typically includes visual direction, planning, blockout, production, integration, and optimization, guiding the process from concept to final in-game implementation.
When should teams outsource environment art?
Outsourcing is useful when internal resources are limited, specialized expertise is needed, or multiple environments must be produced simultaneously.
What should be prepared before starting environment production?
Teams should define visual direction, gameplay requirements, technical constraints, and asset scope to avoid misalignment and reduce rework.
How do you evaluate environment art quality?
Quality is assessed based on visual consistency, gameplay clarity, technical performance, and adherence to production standards.
Conclusion
Game environment art is about both creating visually appealing spaces and establishing a structured process that brings together artistic vision, gameplay needs, and technical constraints into a cohesive whole. Each stage, from defining visual direction to integrating and optimizing assets, plays a role in building a functional and immersive game world.
2D, 3D, and hybrid environment building share a similar pipeline with adjustments depending on specific requirements. Success depends on clear planning, consistent execution, and thoughtful evaluation. By understanding this pipeline end to end, teams can create environments that not only look compelling but also perform reliably and support the player experience.
To develop a pipeline that seamlessly fits into the existing production process, contact our team at RocketBrush Studio.
Create with us
Contact us, and we'll craft the perfect game art for your project